![]()
Today you are going to create a basic setup for a straight skirt. This is the most important tutorial to start with when getting started drawing patterns with Adobe Illustrator. Every single move and click will be explained to you step by step. Take your time and read carefully, do not skip steps and you will notice that you will have created a pattern faster than you had ever imagined!
Stopping in between the tutorial? Prevent losing your work!
On top of the screen go to "FIle > Save As.." to save the document. Write down on paper at which step you stopped to prevent a puzzle searching for the step you need to continue.
IN THIS DEMO TUTORIAL YOU ONLY DRAW THE BACK OF THE SKIRT. IN THE REAL TUTORIAL YOU WILL ALSO LEARN HOW TO DRAW THE FRONT OF THE SKIRT!
BACK
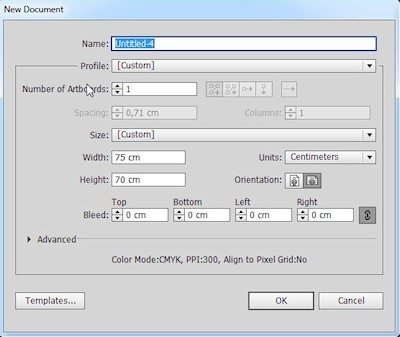 Step 1:Go to 'File > New'
Fill in:
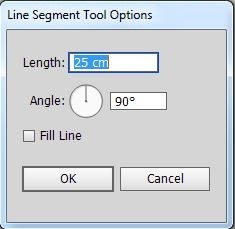
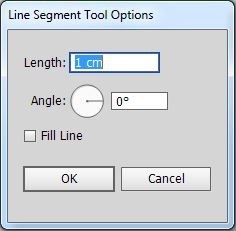
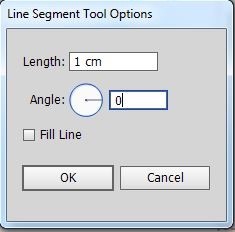
Step 2: Activate the "Line Segment Tool" ![]() (\).
(\).
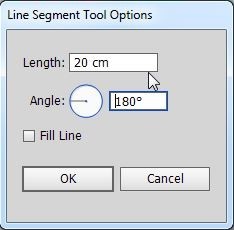
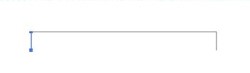
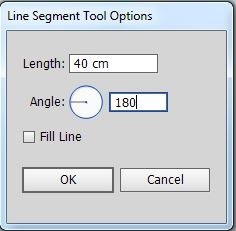
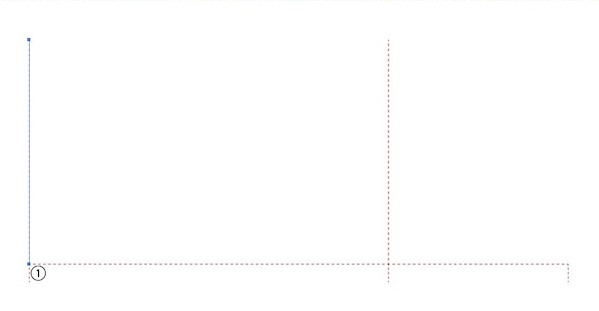
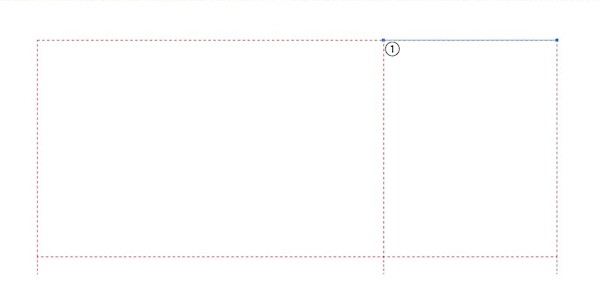
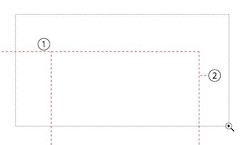
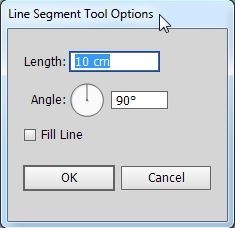
 Step 3: Click at the right bottom on the artboard and fill in:
Tip: After you filled in the value and you want to go to the next value box, click in that box with the mouse. Or you can also press the 'TAB' key on you keyboard to go to the next value box. Then you can directly start to type the new value. When done, click 'OK', of press 'Enter' on your keyboard.
Step 4: Press the keyboard shortcut 'Ctrl-Shift-A' to 'deselect'.

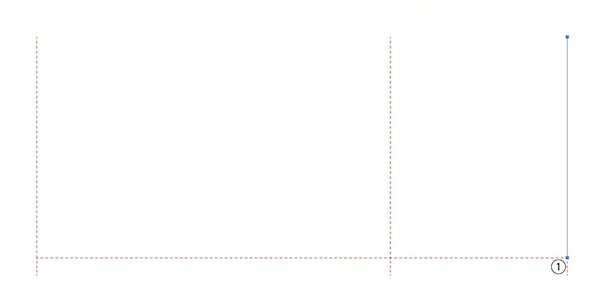
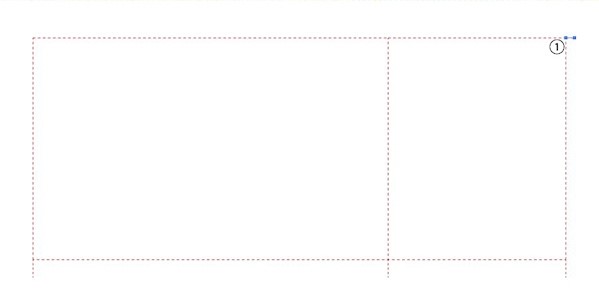
Step 5: Click on the right anchor point and fill in:

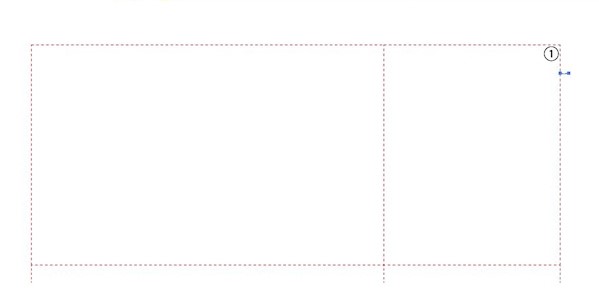
Step 6: Click on the left top anchor point and fill in:
Step 7: Press the keyboard shortcut 'Ctrl-Shift-A' to 'deselect'.
Step 8: Click on the left top anchor point and fill in:

Step 9: Press the keyboard shortcut 'Ctrl-Shift-A' to 'deselect'.

Step 10: Click on the left anchor point and fill in:

Step 11: Activate the "Group Selection Tool" ![]() (Q).
(Q).
Step 12: Click and hold the mouse and drag over all the paths to select them.

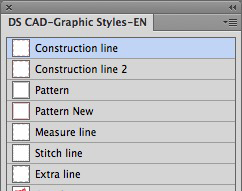
Step 13: At the panel 'DS CAD-Graphic Styles EN' click on 'Construction line', then click next to the paths to deselect.

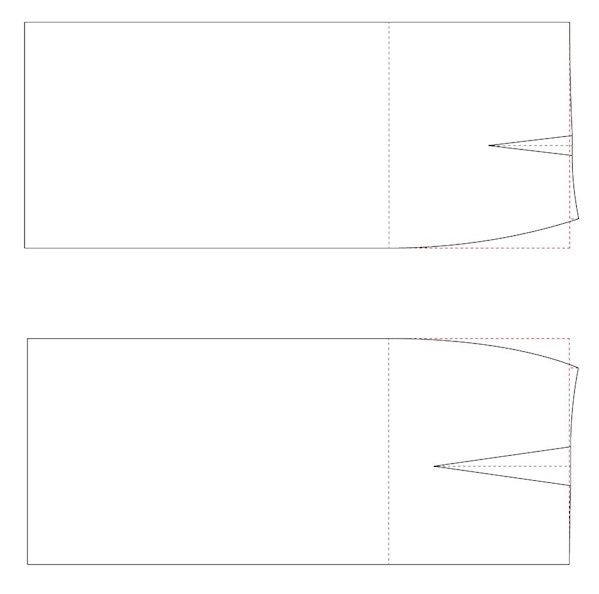
The short paths mark where the paths end. Also, they tell you where you can find the anchor points.
Step 14: Activate the "Line Segment Tool" ![]() (\).
(\).

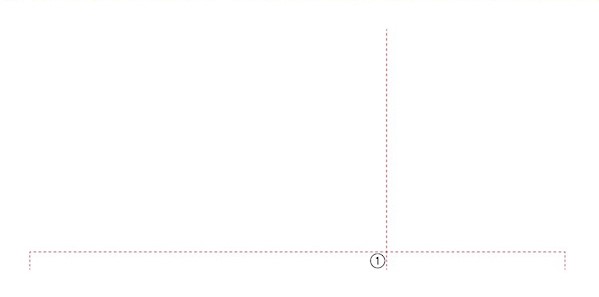
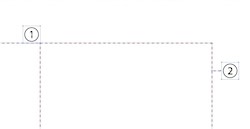
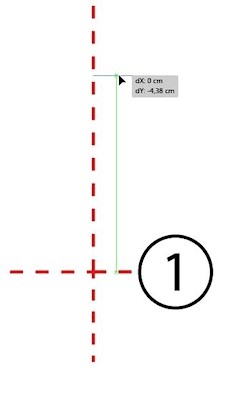
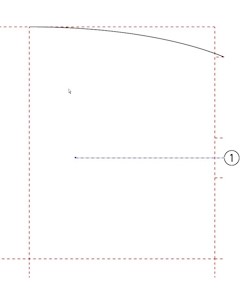
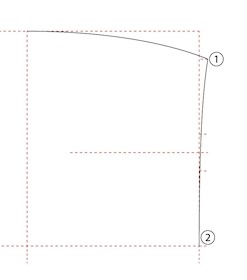
Step 15: Click at the crossing at number 1 and fill in:

Step 16: Click on the anchor point on the long path at number 1 and fill in:
Step 17: Click on the anchor point on the long path at number 1 and fill in:
Step 18: Click on the anchor point left at number 1, keep the mouse pressed and move the mouse right to the anchor point from the center path.
Step 19: Deselect (Ctrl-Shift-A).
Step 20: Click on the anchor point where you just ended, creating the previous path. Keep the mouse pressed and drag the mouse from number 1 to the anchor point from the right path.
Step 21: Deselect (Ctrl-Shift-A).
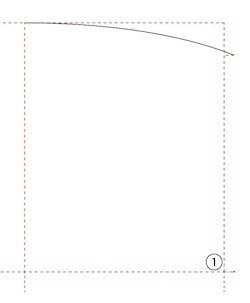
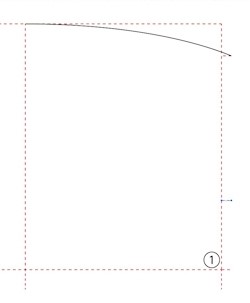
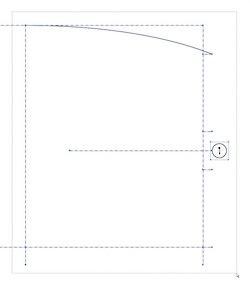
Step 22: Click on the anchor point on the right corner at number 1 and fill in:
Step 23: Keep the path selected and activate the "Group Selection Tool" ![]() (Q).
(Q).

Step 24: Press 'Enter' and fill in:
Step 25: Activate the "Zoom Tool" ![]() (Z).
(Z).
 Step 26: Click and drag a rectangle (marquee) over the area you want to zoom in to.
Step 27: Activate the "Group Selection Tool" ![]() (Q).
(Q).
 Step 28: Click and drag over from the left top of the page to right down, over all the paths to select them.
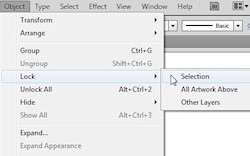
Step 29: On top of the screen go to "Object > Lock > Selection" (Ctrl+2).
Step 30: Activate the "Pen Tool" ![]() (P).
(P).

Step 31: At "DS CAD-Graphic-Styles EN" click on 'Pattern'.
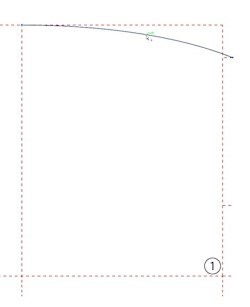
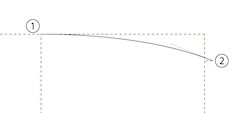 Step 32: To create the curve:
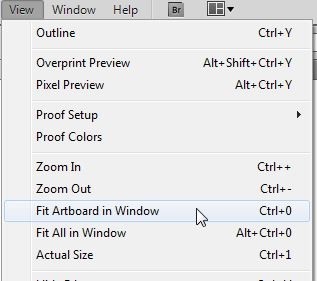
Step 33: On top of the screen choose "View > Fit Artboard in Window" (Ctrl+0).
Step 34: Activate the "Zoom Tool" ![]() (Z).
(Z).
 Step 35: Click left top of the drawing and drag diagonal right downwards to zoom in.
Step 36: Deselect (Ctrl-Shift-A).
Step 37: At "DS CAD-Graphic-Styles EN" click on 'Construction line'.
Step 38: Activate the "Line Segment Tool" ![]() (\).
(\).
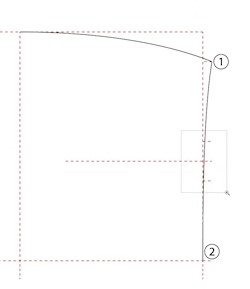
Step 39: Click on the crossing at 1 and fill in:
Step 40: Activate the "Group Selection Tool" ![]() (Q).
(Q).
 Step 41: Click on the path to pick it up, keep the mouse pressed and drag up, while you drag press 'Alt'. First release the mouse, then 'Alt'. How far you drag the copy up does not matter.
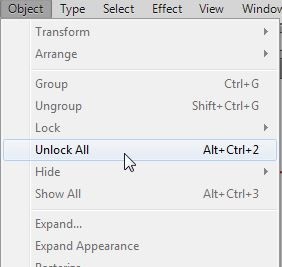
Step 41: On top of the screen choose 'Object > Unlock All' (or press 'F8' when DS Actions are installed).
Step 42: Activate the "Group Selection Tool" ![]() (Q).
(Q).

Step 43: Select the hip curve and go on top of the screen to choose 'Object > Lock > Selection (Ctrl+2).
 Step 44: Press and hold 'Shift' and click on the three short paths to select them.
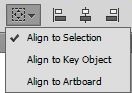
 Step 45: On top of the screen choose "Vertical Distribute Center". This will divide the paths between the top and bottom path.
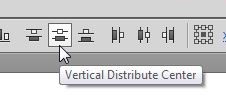
When it does not work, undo (Ctrl-Z) and click on the icon left from all the align buttons and choose 'Align to Selection'. Now try step 45 again.
Step 46: Activate the "Group Selection Tool" ![]() (Q).
(Q).
Step 47: Deselect (Ctrl-Shift-A).
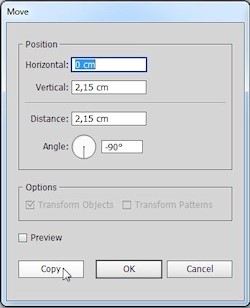
Step 48: At 1, select the path then press 'Enter' and fill in:
Step 49: With this copy still selected, press 'Enter' again and fill in:
Step 50: Activate the "Direct Selection Tool" ![]() (A).
(A).
 Step 51: Select the path at 1 and click on the left anchor point.
Make sure you do not move the path by accident.
The left anchor point is dark blue inside and the right one is white inside because the left one is selected and the right one is not...

Step 52: Press 'Enter' and fill in:
 Step 53: Click and drag a marquee around the drawing to select all paths.

Step 54: At tot top of the screen choose 'Object > Lock > Selection (Ctrl+2).
Step 55: Activate the 'Pen Tool' ![]() (P).
(P).
Step 56: Inside 'DS CAD-Graphic Styles EN', click on 'Pattern'.
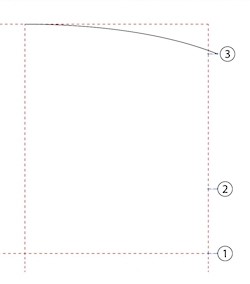
 Step 57: To create this curve:
While you drag you can press and hold 'Shift' to get the handle to go straight down.
When you did not zoom out enough, it might be possible that your drawings runs upwards. When that happens, Undo twice (Ctrl-Z) and draw the curve again.
Step 58: Press and hold 'Ctrl' (Cmd on mac) and click next to the path, this way the path is 'deselected' as well.
Step 59: Activate the "Zoom Tool" ![]() (Z).
(Z).
 Step 60: Draw a marquee around a detail of the drawing (see image) to zoom in.
Step 61: Activate the 'Group Selection Tool'  (Q).
(Q).
Step 62: Select the black path.
Step 63: Activate the 'Pen Tool' ![]() (P).
(P).
When you move the mouse on top of the path, a plus is shown next to the pen cursor. This means that when you click another anchor point will be added.
 Step 64: Click on the black path, just next tot he small red paths to add two anchor points.
Step 65: Activate the "Direct Selection Tool" ![]() (A).
(A).
 Step 66: Move the anchor points at 1 and 2.
 Step 67: Because we added anchor points on a curved path, they are automatically 'Smooth Points' with handles. We want to create a straight path between the two paths at 1 and 2.
This way we can make the paths under the curve straight.
Don't worry when the path curve changes during this action. As soon as the handle is back on top of the anchor point, the curve will be back as it was. Did you release the handle before it was exactly on the anchor point? Undo (Ctrl + Z) once and try to move the handle on top of the anchor point again.
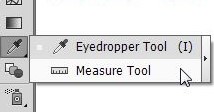
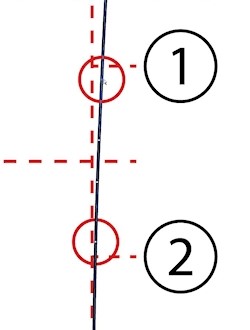
Step 68: Activate the "Measure Tool".
 Step 69: Click on an anchor point inside the red circle, keep the mouse pressed and drag it exactly on top of the anchor point inside the other circle, then release the mouse.
Automatically there opens a panel called 'Info'. Look at 'W': this is the distance over the width which is a very tiny distance!
Step 70: Divide this distance by 2 and write the answer on a paper.
You can click the panel 'Info' away.
Step 71: Activate the "Direct Selection Tool" ![]() (A).
(A).
Step 72: We are going to move the anchor point inside the red circle at 1 to the left. We will move it with the distance value we wrote down an a paper. This is how you do that:
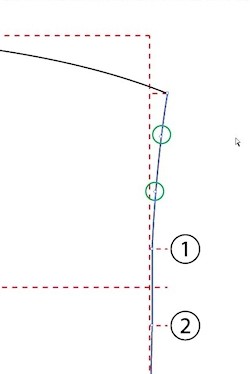
Click on the anchor point that is inside the red circle at 1, press 'Enter' and fill in:
 Step 73: Click on the anchor point inside the bottom circle at 2. Press and hold the 'Shift' key and click on the anchor point inside the top circle at 1 to add that to the selection.
The order in which you click inside circle 2 and then inside circle 1 is important. This keeps the the last anchor point (at 1) where you clicked on selected. Now when you use the Align action, the anchor point where you clicked on last (at 1) will be fixed and the other one (2) will move.
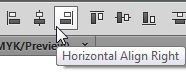
Step 74: On top of the screen, you see the Align buttons. Click on the button 'Horizontal Align Right' to align the bottom anchor point to the one at 1.
Step 75: On top of the go to "View - Fit Artboard in Window" (Ctrl+0).
Step 76: Activate the "Zoom Tool" ![]() (Z).
(Z).
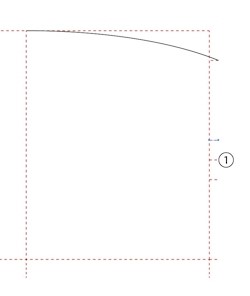
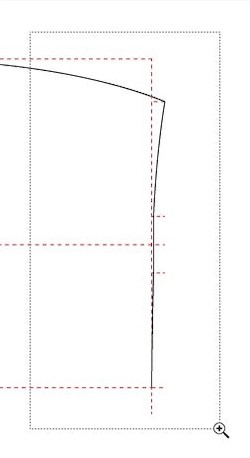 Step 77: Click and drag a marquee around over the waist line to zoom in. Now you can check if the curves looks nice.
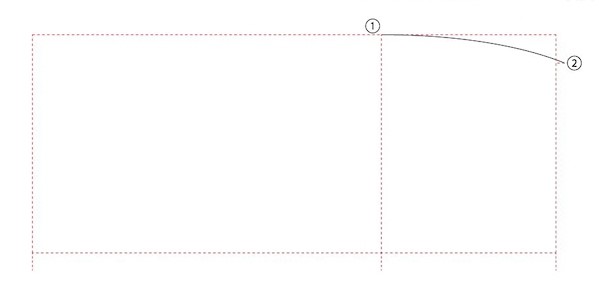
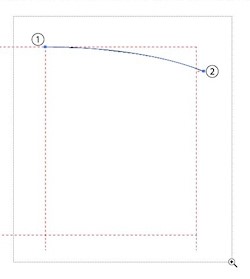
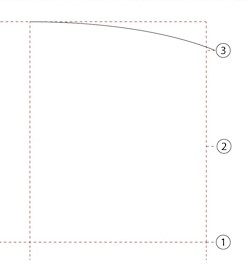
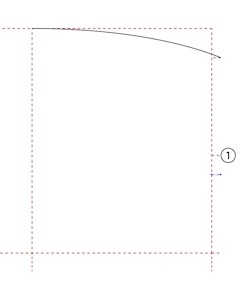
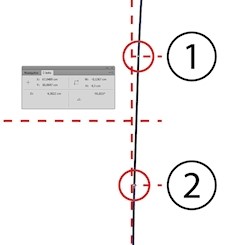
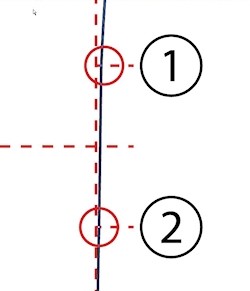
 Step 78: Maybe you need to make a correction to the curve. This is how you do that:
![]()
If necessary, carry out the same steps at 2.
Step 79: Acitvate the "Zoom Tool" ![]() (Z).
(Z).
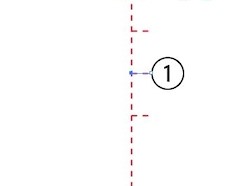
Step 80: Click and drag a marquee over the lines 1, 2 and 3 to zoom in.

Step 81: Activate the "Group Selection Tool" ![]() (Q.
(Q.
Step 82: Go on top of the screen to 'Object > Unlock All' (F8 when DS Actions are installed).
Step 83: Select the small horizontal paths at 1 and 2 and delete them by pressing the 'Backspace' key.
Step 84: Activate the "Direct Selection Tool" ![]() (A).
(A).
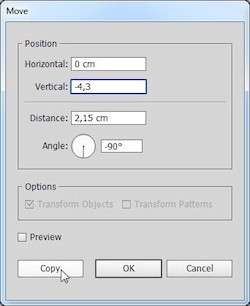
Step 85: Select the waist line.
You can see the anchor points which is handy for the next steps.
Step 86: Activate the "Line Segment Tool" ![]() (\).
(\).
![]()
Step 87: On top of the screen go to 'View > Smart Guides' (Ctrl-U) to activate it again.
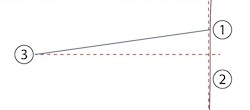 Step 88: Click at anchor point 1 and drag to the anchor point at 3 to create a path.
Step 89: Activate the "Direct Selection Tool" ![]() (A).
(A).
Step 90: Select the waist line.
Step 91: Activate the "Line Segment Tool" ![]() (\).
(\).
 Step 92: Click on the anchor point at 2 and drag the mouse to the anchor point at 3.
Step 93: On top of the screen choose "View - Fit Artboard in Window" (Ctrl+0).
Step 94: Activate the "Group Selection Tool" ![]() (Q.
(Q.
Step 95: Press and hold 'Shift', then select the path 1 to 2, 2 to 3 and 3 to 4.

Step 96: Inside the panel 'DS CAD-Graphic Styles EN' click on 'Pattern'.
Step 97: Click outside the drawing to deselect (Ctrl-Shift-A).
Step 98: Activate the "Line Segment Tool" ![]() (\).
(\).
 Step 99: Inside the panel 'DS CAD-Graphic Styles EN' click on 'Construction line'.
Step 100: Click on the anchor point at 1 (on the corner or the two paths) and fill in:

________________________________________________________________
Rechte rok
Vandaag ga jij een basis opzet van een rechte rok maken. Een rechte rok wordt ook wel koker rok genoemd. Dit is de meest belangrijke tutorial om met patroontekenen in Adobe Illustrator te gaan starten. Hier wordt elke handling stap voor stap uitgelegd. Neem je tijd en lees zorgvuldig, sla geen stappen over en je zal zien dat je sneller een patroon hebt getekend dan je dacht!
Tussentijds stoppen? Voorkom verlies van je werk!
Ga bovenaan naar "Bestand > Opslaan Als.." en bewaar het document. Schrijf op een papiertje (of in je fancy Android / Apple apparaat) bij welke stap je was gebleven en voorkom dat je de volgende keer moet gaan puzzelen!
IN DEZE DEMO TUTORIAL WORDT ALLEEN HET ACHTERPAND GEMAAKT. IN DE ECHTE TUTORIAL LEERT U DAARNA OOK HET VOORPAND TE TEKENEN!
ACHTERPAND
Stap 1: Ga naar Bestand > Nieuw.
Vul in:
Klik op 'OK'.
Stap 2: Activeer het gereedschap "Lijnsegment" ![]() (\).
(\).
Stap 3: Klik rechts onderin op het Artboard en vul in:
Tip: Als je bij lengte het getal hebt ingevuld en je wilt naar het volgende vakje, dan kan je er met de muis in klikken. Maar je kan ook op de Tab toets van je toetsenboard drukken om naar het volgende vakje te gaan. Je kan dan direct het nieuwe getal typen. En als je het volgende getal ingevuld hebt, dan kan je op OK klikken, maar als je sneller wilt werken, dan kan je ook op de Enter toets van je toetsenbord drukken.
Stap 4: Gebruik je toetsenbord en toets de combinatie in: (Ctrl-Shift-A) om te 'deselecteren'.
Stap 5: Klik met je muis op het rechter ankerpunt en vul in:
Stap 6: Klik met je muis op het ankerpunt links boven en vul in:
Stap 7: Gebruik je toetsenbord en toets de combinatie in: (Ctrl-Shift-A) om te 'deselecteren'.
Stap 8: Klik met je muis op het ankerpunt links boven en vul in:
Stap 9: Gebruik je toetsenbord en toets de combinatie in: (Ctrl-Shift-A) om te 'deselecteren'.
Stap 10: Klik met je muis op het linker ankerpunt en vul in:
Stap 11: Activeer het gereedschap "Groep selecteren" ![]() (Q).
(Q).
Stap 12: Klik met je muis links boven de lijnen en sleep met de muisknop ingedrukt naar rechts onder om alle lijnen te selecteren.

Stap 13: Klik met je muis bij " DS CAD-Graphic Styles NL" op "Hulplijn Opzet" en klik naast de tekening om de lijnen te deselecteren.
De korte streepjes zijn een aanduiding waar een lijn begint en eindigt en dat er op de lange lijn nog een ankerpunt ligt.
Stap 14: Activeer het gereedschap "Lijnsegment" ![]() (\).
(\).
Stap 15: Klik met je muis op de kruising bij nummer 1 en vul in;
Stap 16: Klik met je muis op het ankerpunt van de lange lijn bij nummer 1 en vul in:
Stap 17: Klik met je muis op het ankerpunt van de lange lijn bij nummer 1 en vul in:
Stap 18: Klik op het ankerpunt links boven bij nummer 1 en met de muisknop ingedrukt sleep je de muis naar het ankerpunt van de middelste lijn.
Stap 19: Deselecteer (Ctrl-Shift-A).
Stap 20: Klik op het ankerpunt bij waar je bij de vorige stap geeindigd bent en met de muisknop ingedrukt sleep je de muis vanaf nummer 1 naar het ankerpunt van de rechter lijn.
Stap 21: Deselecteer (Ctrl-Shift-A).
Stap 22: Klik op het ankerpunt rechts boven bij nummer 1 en vul in:
Stap 23: Laat het lijntje geselecteerd en activeer het gereedschap "Groep selecteren" ![]() (Q).
(Q).
Stap 24: Druk op 'Enter' en vul in:
Stap 25: Activeer het gereedschap "Zoom" ![]() (Z).
(Z).
Stap 26: Klik met je muis en sleep een rechthoek over waar je naar toe wilt inzoomen.
Stap 27: Activeer het gereedschap "Groep selecteren" ![]() (Q).
(Q).
Stap 28: Klik met je muis links boven de tekening en sleep met de muisknop ingedrukt naar rechts onder om alle lijnen te selecteren.
Stap 29: Kies in de bovenbalk "Object - Vergrendelen - Selectie" (Ctrl+2)
Stap 30: Activeer het gereedschap "Pen" ![]() (P).
(P).

Stap 31: Klik met je muis bij "DS CAD-Graphic Styles NL" op "Patroon".
Stap 32: Om deze bocht te maken:
Stap 33: Kies in de bovenbalk "Weergave - Tekengebied passend in venster" (Ctrl+0).
Stap 34: Activeer het gereedschap "Zoom" ![]() (Z).
(Z).
Stap 35: Klik met de muis boven de tekening en sleep met de muisknop ingedrukt schuin over de tekening om het rechter vierkant in te zoomen.
Stap 36: Deselecteer (Ctrl-Shift-A).
Stap 37: Klik met je muis bij "DS CAD-Graphic Styles NL" op "Hulplijn Opzet".
Stap 38: Activeer het gereedschap "Lijnsegment" ![]() (\).
(\).
Stap 39: Klik op het kruispunt rechts onder bij nummer 1 en vul in:
Stap 40: Activeer het gereedschap "Groep selecteren" ![]() (Q).
(Q).
Stap 41: Met het lijntje nog steeds geselecteerd druk de 'Alt' toets in en sleep de lijn naar boven om het te kopiëren. De afstand maakt nog niet zo veel uit.
Stap 41: Kies in de bovenbalk "Object - Alles ontgrendelen" (F8 als je de DS Actions hebt geinstalleerd).
Stap 42: Activeer het gereedschap 'Groep selecteren" ![]() (Q).
(Q).
Stap 43: Selecteer de heupronding en kies uit de bovenbalk "Object - Vergrendelen - Selectie" (Ctrl+2)
Stap 44: Houd de 'Shift' toets ingedrukt en selecteer de drie korte lijntjes.
Stap 45: Selecteer uit de bovenbalk Vertikaal verdelen midden" om het middelste lijntje te verdelen tussen de bovenste en onderste lijn.
Lukt dit niet controleer dan of "Uitlijnen op selectie" is aangevinkt, Ongedaan maken (Ctrl-Z) en klik opnieuw op "Vertikaal verdelen midden".
Stap 46: Activeer het gereedschap "Groep selecteren" ![]() (Q).
(Q).
Stap 47: Deselecteer met de sneltoets (Ctrl-Shift-A), of klik in het wit om te deselecteren.
Stap 48: Selecteer het lijntje bij 1 , druk op 'Enter' en vul in:
Stap 49: Met het lijntje nog steeds geselecteerd, druk op 'Enter' en vul in:
Stap 50: Activeer het gereedschap "Direct Selecteren" ![]() (A).
(A).
Stap 51: Selecteer het lijntje bij 1 en selecteer dan het linker ankerpunt.
Het linker ankerpunt ziet er nu donker uit en het rechter ankerpunt, omdat het niet is geselecteerd is wit van binnen.
Stap 52: Druk op 'Enter' en vul in:
Stap 53: Klik met de muis boven de tekening en sleep met de muisknop ingedrukt schuin over de tekening om alle lijnen te selecteren.
Stap 54: Kies in de bovenbalk "Object - Vergrendelen- Selectie" (Ctrl+2)
Stap 55: Activeer het gereedschap "Pen" ![]() (P).
(P).

Stap 56: Klik met je muis bij "DS CAD-Graphic Styles NL" op "Patroon".
Stap 57: Om deze bocht te tekenen:
Tijdens het slepen kan je de 'Shift' toest ingedrukt houden, zo gaat de lijn recht naar beneden.
Als je niet ver genoeg bent uitgezoomd, dan schiet je tekening mogelijk ineens omhoog. Als het mis gaat, dan tweemaal 'Ongedaan maken' (Ctrl-Z) en teken de bocht opnieuw.
Stap 58: Houdt de Control (Ctrl) toets ingedrukt en klik naast de lijn, zo is de lijn gelijk 'gedeselecteerd'.
Stap 59: Activeer het gereedschap "Zoom" ![]() (Z).
(Z).
Stap 60: Selecteer een detail van de tekening om in te zoomen.
Stap 61: Activeer het gereedschap 'Groep Selecteren' (Q).
Stap 62: Selecteer de zwarte lijn
Stap 63: Activeer het gereedschap 'Pen' ![]() (P).
(P).
Als een lijn is geselecteerd, en je gaat er met de het gereedschap Pen boven hangen, dan komt er een plusje bij de Pen cursor te staan. Dat betekent dat wanneer je op de lijn klikt, dat er automatisch een ankerpunt wordt toegevoegd.
Stap 64: Klik op de zwarte lijn vlak naast de lijntjes 1 en 2 om punten toe te voegen.
Stap 65: Activeer het gereedschap "Direct selecteren" ![]() (A).
(A).
Stap 66: Verplaats de punten op de lijntjes van 1 en 2. .
Stap 67: Omdat er punten op een ronde lijn zijn geplaatst worden deze automatisch een "vloeiend punt" met handles. Wij willen een rechte lijn creëren tussen de streepjes van 1 en 2.
Daardoor kunnen wij het stukje lijn er tussen zodadelijk recht maken zonder bocht.
Schrik niet als tijdens deze handeling de zwarte lijn van bocht veranderd. Zodra de handle op de punt staat is de lijn weer zoals hij was. Laat je de handle los voordat hij op de punt staat, eenmaal ongedaan maken (Ctrl + Z) en plaats de handle op de punt of verricht de handeling opnieuw.
Stap 68: Activeer het gereedschap "Meetlat".
Stap 69: Klik op een punt in de cirkel en sleep met de muisknop ingedrukt naar het punt in de andere cirkel en laat de muis los.
Er opent automatisch een panel dat heet 'Info'. Kijk bij 'W:" (dat is de afstand over de breedte die wij net hebben afgelegd, een hele kleine afstand!).
Stap 70: Deel deze afstand door 2 en schrijf dit op.
Je mag het menu info nu weer wegklikken.
Stap 71: Activeer het gereedschap "Direct selecteren" ![]() (A).
(A).
Stap 72: Wij gaan het ankerpunt in de rode circel bij nummer 1 naar links verplaatsen met het getal wat je hebt opgeschreven. Dit doe je als volgt:
Klik op het ankerpunt die omcirceld is bij nummer 1, druk op 'Enter' en vul in:
Stap 73: Klik op het ankerpunt in de onderste circel bij nummer 2 houdt de 'Shift' toets ingedrukt en klik dan op het punt in de bovenste circel om het aan de selectie toe te voegen.
De volgorde van het aanklikken van het eerste punt in circel 2 en dan pas circel 1 is belangrijk. Namelijk als je hierna de uitlijn knop gaat gebruiken, dan blijft het laatste punt waar je op klikte vast staan en het eerste punt waar je op hebt geklikt (in circel 2) schuift op.
Stap 74: Selecteer uit de bovenbalk "Horizontaal uitlijnen rechts" om het onderste punt uit te lijnen aan het bovenste punt bij nummer 1.
Stap 75: Kies in de bovenbalk "Weergave - Tekengebied passend in venster" (Ctrl+0).
Stap 76: Activeer het gereedschap "Zoom" ![]() (Z).
(Z).
Stap 77: Trek een rechthoek over de taillelijn om hier naar toe in te zoomen. Nu kan je de ronding controleren of die mooi soepel loopt.
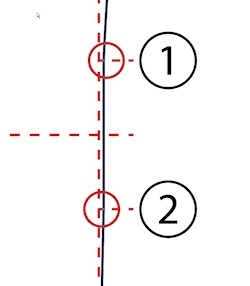
Stap 78: Een eventuele correctie van de ronding doe je als volgt:
![]()
Herhaal bovenstaand op de lijn onder nummer 2 indien noodzakelijk.
Stap 79: Activeer het gereedschap "Zoom" ![]() (Z).
(Z).
Stap 80: Klik en sleep een rechthoek over de lijnen van 1,2 en 3 om hier naar toe in te zoomen.
Stap 81: Activeer het gereedschap "Groep selecteren" ![]() (Q.
(Q.
Stap 82: Ga bovenaan naar 'Object > Alles ontgrendelen' (F8 als je de DS Actions hebt geinstalleerd).
Stap 83: Selecteer de kleine horizontale lijntjes bij de nummers 1 en 2 en verwijder ze door de 'Backspace' toets in te drukken.
Stap 84: Activeer het gereedschap "Direct selecteren" ![]() (A).
(A).
Stap 85: Selecteer de taillelijn
Nu kan je de ankerpunten zien, dat is handig voor de volgende stappen.
Stap 86: Activeer het gereedschap "Lijnsegment" ![]() (\).
(\).
![]()
Stap 87: Kies uit de bovenbalk "Weergave- Slimme hulplijnen" (Ctrl-U) en klik om de Slimme hulplijnen te activeren.
Stap 88: Klik met de muis op het ankerpunt bij 1 en sleep de muis naar het ankerpunt op het uiteinde van de lijn bij 3.
Stap 89: Activeer het gereedschap "Direct selecteren" ![]() (A).
(A).
Stap 90: Selecteer de taillelijn.
Stap 91: Activeer het gereedschap "Lijnsegment" ![]() (\).
(\).
Stap 92: Klik met de muis op het ankerpunt bij 2 en sleep de muis naar het ankerpunt op het uiteinde van de lijn bij 3.
Stap 93: Kies in de bovenbalk "Weergave- Tekengebied passend in venster" (Ctrl+0)
Stap 94: Activeer het gereedschap "Groep selecteren" ![]() (Q.
(Q.
Stap 95: Selecteer de lijn van 1 naar 2 , van 2 naar 3 en de lijnen tussen 3 en 4.
Stap 96: Klik met je muis bij "DS CAD-Graphic Styles NL" op "Patroon".
Stap 97: Klik in het wit om te deselecteren (Ctrl-Shift-A).
Stap 98: Activeer het gereedschap "Lijnsegment" ![]() (\).
(\).

Stap 99: Klik met je muis bij "DS CAD-Graphic Styles NL" op "Hulplijn Opzet" .
Stap 100: Klik met de muis op het ankerpunt bij punt 1 (op de hoek stippellijn) en vul in:
![]()